Change Data Capture from Postgres with AWS DMS
AWS Data Engineer Roadmap
Capture every INSERT/UPDATE/DELETE in real time with AWS DMS, replicating Postgres CDC to either a second RDS instance or an S3 lake.
Chapter 6 of 6 — AWS Data Engineer Roadmap
End-to-end student lab: provision your own Postgres on RDS, load the oil data into it, and capture every INSERT/UPDATE/DELETE in real time via AWS DMS. The lab supports two target options — pick one based on what you want to learn:
| Option A — PostgreSQL target | Option B — S3 target | |
|---|---|---|
| Target | Second RDS Postgres instance | S3 bucket (CSV files) |
| Migration type | Migrate and replicate (full load + CDC) | Replicate data changes only (CDC-only) |
| Best for | Understanding Postgres-to-Postgres replication, homogeneous migrations | Understanding how CDC feeds a data lake, I/U/D file format |
| Screenshots | Included in this guide | Described in steps below |
This lab requires temporary admin access to your AWS account (the instructor will grant it for the session). RDS parameter groups, DMS replication instances, and IAM service roles all need permissions beyond the standard quicklabs-studentN policies.
Replace <U> throughout with your username digit (e.g. 8 for quicklabs-student8).
What you'll build
  ┌─────────────────────┐    write-ahead log     ┌──────────────────────┐
  │ RDS Postgres        │ ─────────────────────▶ │ DMS replication      │
  │ oil-db-<U>          │   (logical decoding)   │ instance             │
  │ public.crude_oil_   │                        │ oil-cdc-rep-<U>      │
  │ daily               │                        └──────┬───────┬───────┘
  └─────────────────────┘                               │       │
              ▲                                         │       │
              │ INSERT / UPDATE / DELETE                │       │
              │ (you, via psql)                         │       │
                                           ┌────────────┘       └─────────────┐
                                           ▼                                  ▼
                               ┌──────────────────────┐    ┌──────────────────────┐
                               │ Option A             │    │ Option B             │
                               │ RDS Postgres target  │    │ S3 target            │
                               │ oil_target DB        │    │ s3://quicklabs-      │
                               │ crude_oil_daily      │    │ student<U>-curated/  │
                               │ (full load + CDC)    │    │ cdc/  (CDC-only)     │
                               └──────────────────────┘    └──────────────────────┘
By the end you'll have:
- Your own RDS Postgres source with the 6,367-row oil table
- A working DMS pipeline replicating to either a second Postgres RDS instance (Option A) or an S3 bucket (Option B)
- A clear understanding of the gotchas: SSL, logical replication, plugin init, replication slots
Prerequisites
- Temp admin access granted (your instructor attaches
AdministratorAccessto your IAM user for this session) - AWS console as
quicklabs-student<U>in us-west-2 (don't switch regions) - Sign out and sign back in after admin access is attached, so your session picks up the new policy
psqlinstalled locally (brew install libpqon macOS,apt install postgresql-clienton Linux)- Repo cloned locally — you'll use the loader script from
lab-3-lake-formation/demo/rds-source/
Part 1 — Create your RDS Postgres with logical replication (15 min)
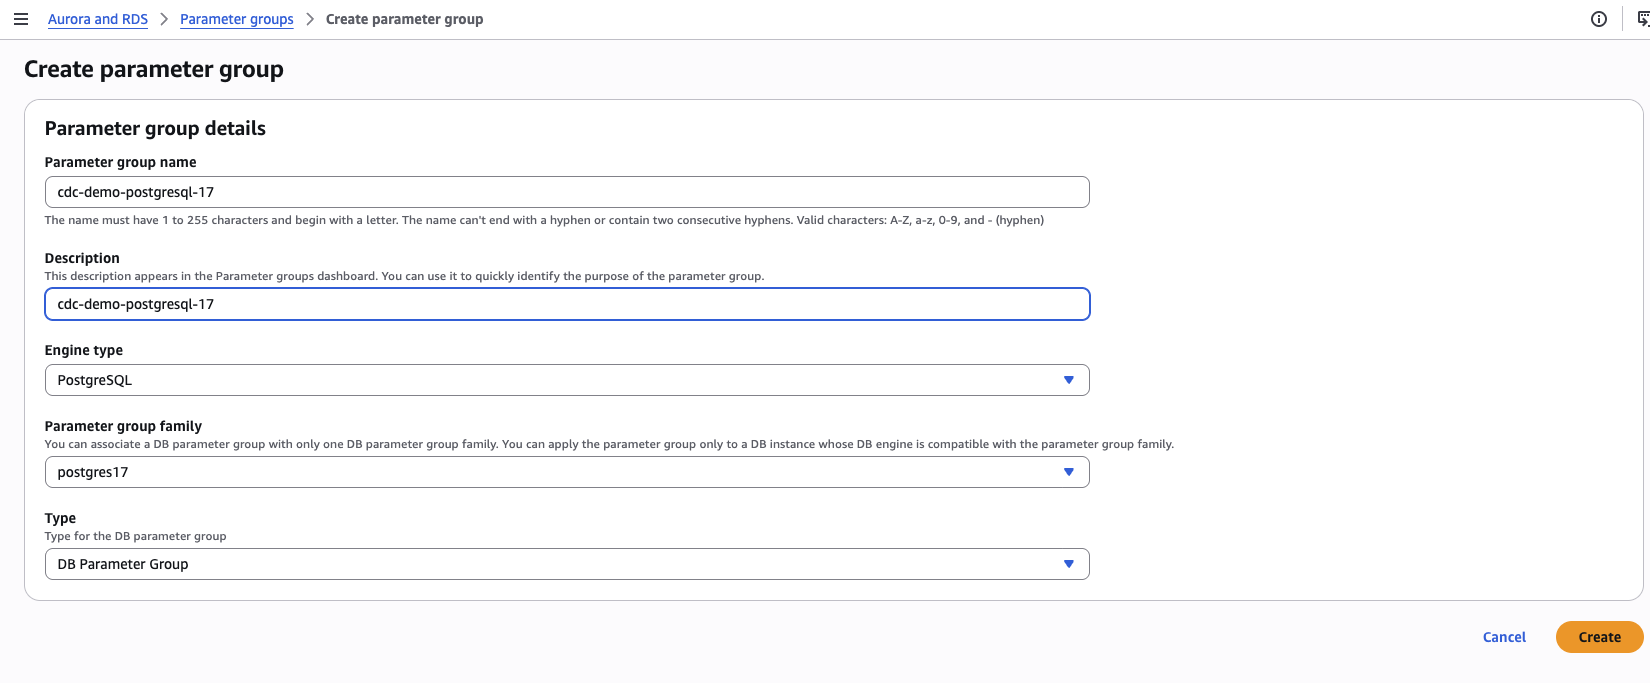
1.1 Create a custom parameter group
RDS console → Parameter groups → Create parameter group
| Field | Value |
|---|---|
| Parameter group family | postgres17 |
| Type | DB parameter group |
| Group name | oil-cdc-pg-<U> |
| Description | Postgres + logical replication for student<U> |
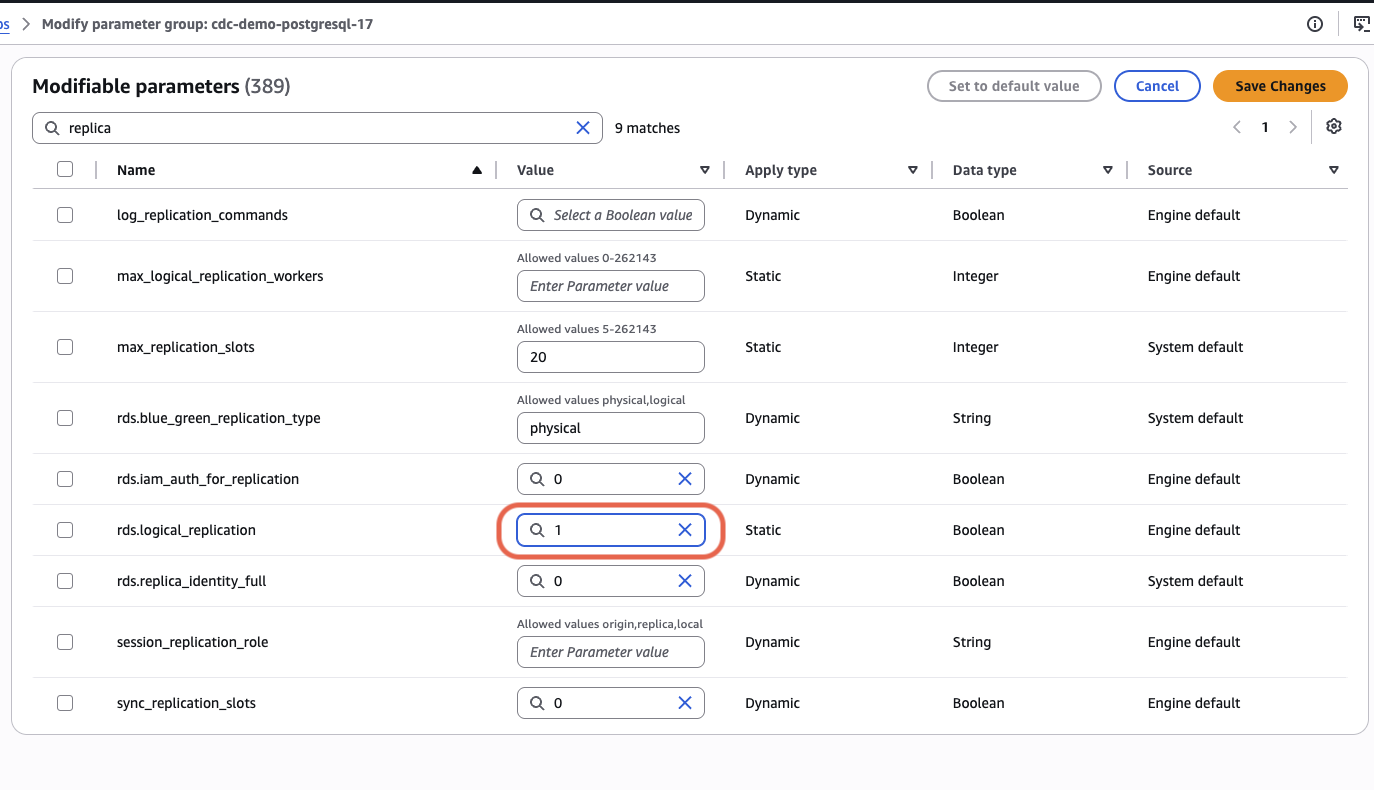
Open the new group → search rds.logical_replication → Edit parameters → set value to 1 → Save.
1.2 Create the RDS instance
RDS console → Databases → Create database
| Field | Value |
|---|---|
| Creation method | Standard create |
| Engine | PostgreSQL |
| Version | 17.x (do NOT pick 18.x — DMS has version-lag for the newest PG major) |
| Templates | Free tier (or Dev/Test) |
| DB instance identifier | oil-db-<U> |
| Master username | postgres |
| Master password | pick a strong one, write it down |
| DB instance class | db.t3.micro |
| Storage | 20 GB gp3, no autoscaling |
| Public access | Yes |
| VPC security group | Create new → oil-db-sg-<U> |
| Initial database name | (leave blank — we'll create it) |
| Backup retention | 0 days |
| Enhanced monitoring | Off |
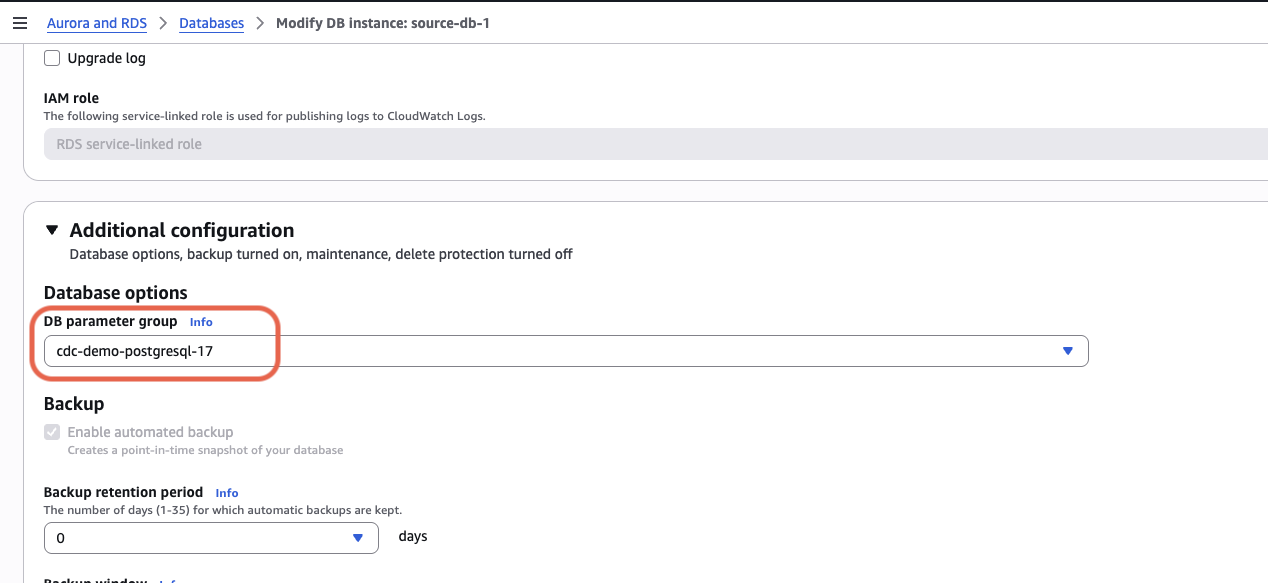
| DB parameter group (under Additional configuration) | oil-cdc-pg-<U> (THIS is the critical part) |
Click Create database. Provisioning takes ~6 minutes.
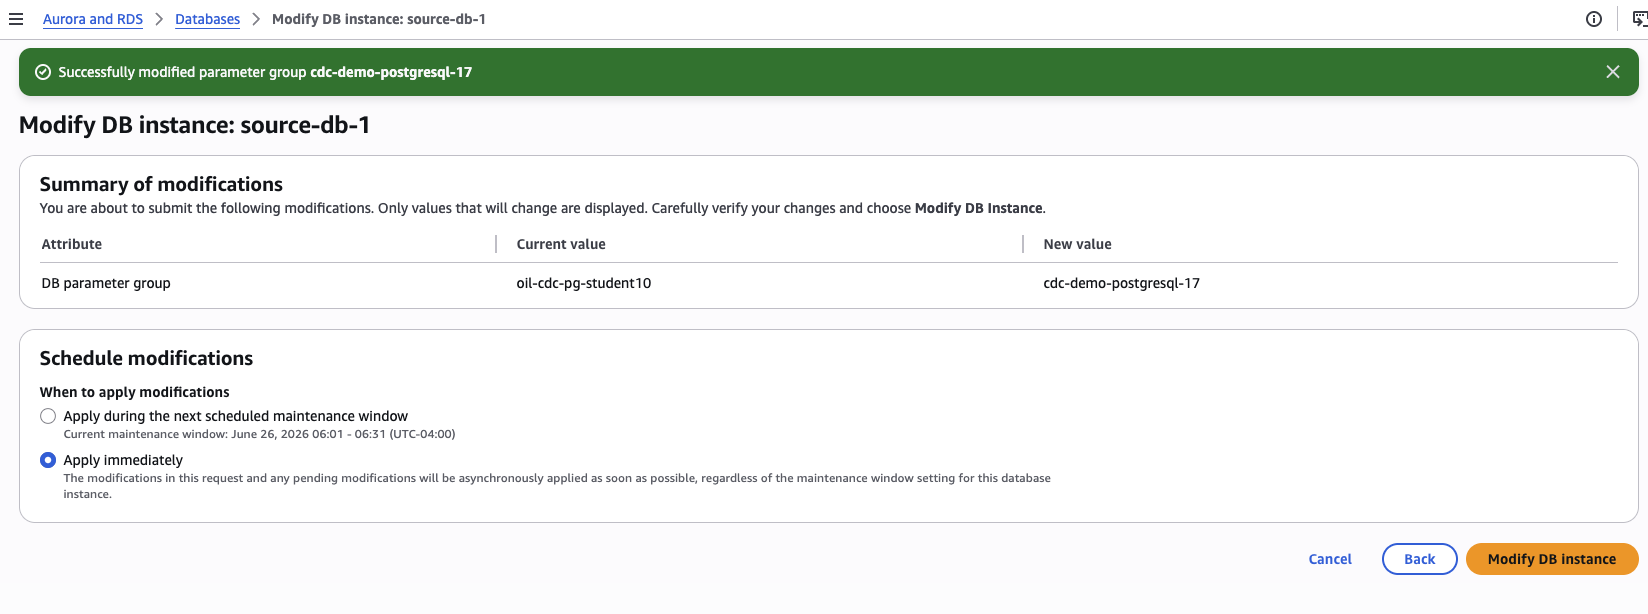
If you forgot to set the parameter group during creation: go to RDS → Databases → your instance → Modify, scroll to Additional configuration → DB parameter group, select your group, and choose Apply immediately.
1.3 Edit the security group inbound rules
While RDS provisions, EC2 console → Security Groups → oil-db-sg-<U> → Edit inbound rules. Add two rules:
| Type | Protocol | Port | Source | Why |
|---|---|---|---|---|
| PostgreSQL | TCP | 5432 | My IP | Your laptop's psql access |
| PostgreSQL | TCP | 5432 | The SG itself (sg-...) | So the DMS replication instance can reach Postgres |
1.4 Wait for in-sync and verify logical replication
Once the instance shows Available, run from your laptop:
aws rds describe-db-instances --region us-west-2 --db-instance-identifier oil-db-<U> \
  --query 'DBInstances[0].DBParameterGroups[0]' --output json
Status must be "ParameterApplyStatus": "in-sync". If it says pending-reboot, reboot:
aws rds reboot-db-instance --region us-west-2 --db-instance-identifier oil-db-<U>
aws rds wait db-instance-available --region us-west-2 --db-instance-identifier oil-db-<U>
Then re-check status. Don't proceed until in-sync.
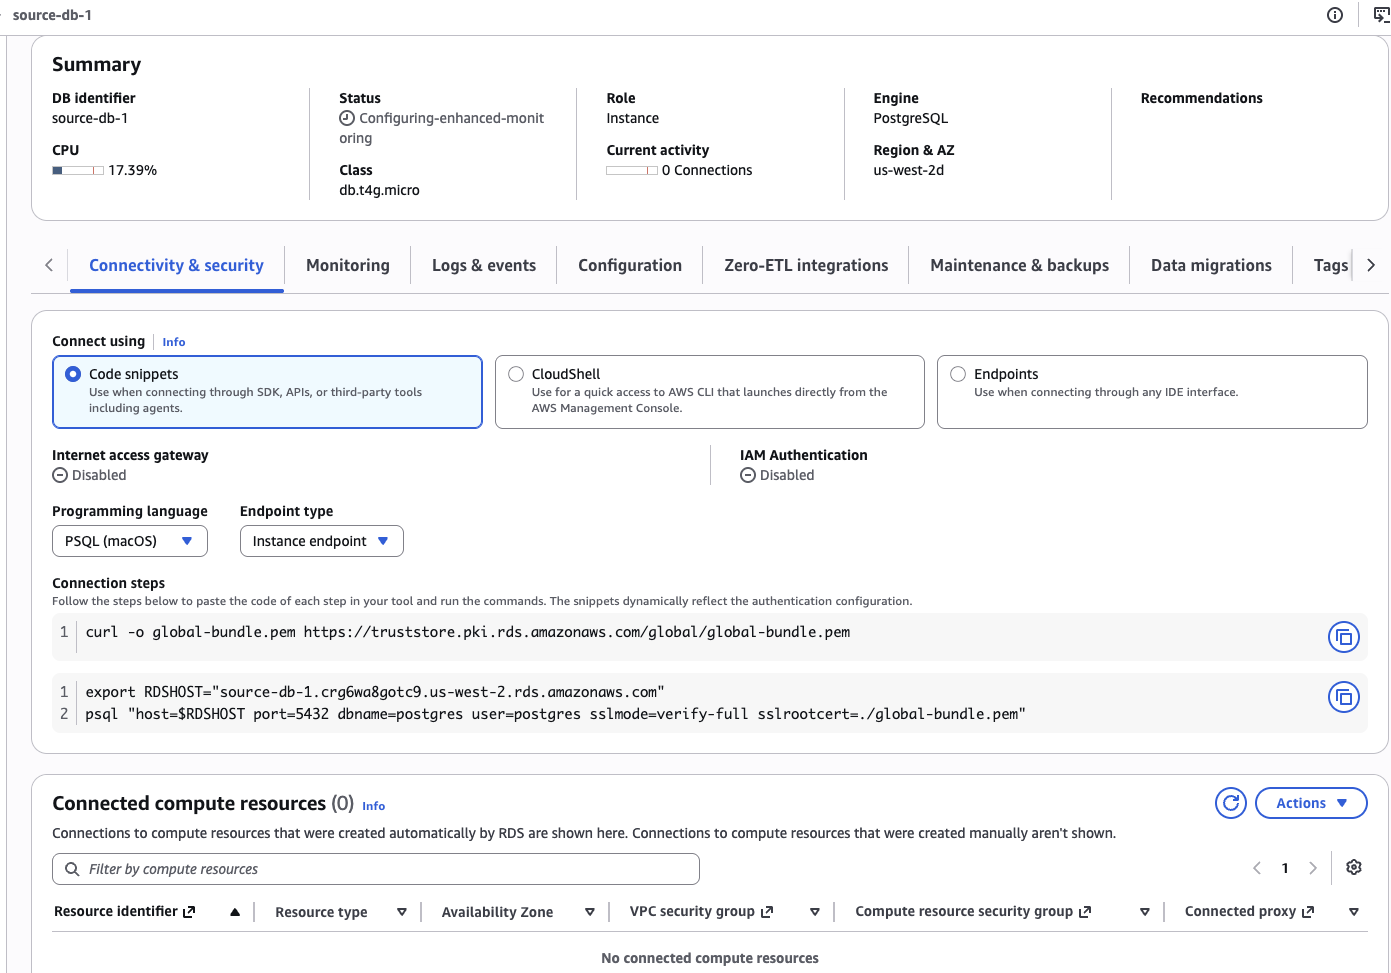
Once available, your RDS instance detail page should look like this — note the connection strings at the bottom:
Part 2 — Load the oil data (3 min)
export RDSHOST=oil-db-<U>.xxx.us-west-2.rds.amazonaws.com  # copy the actual endpoint from RDS console
export PGPASSWORD=<your-postgres-password>

cd lab-3-lake-formation/demo/rds-source
./load_oil.sh
This downloads the RDS CA bundle, creates database oil, applies the schema (CREATE TABLE with loaded_at column + trigger), and \copys the 6,367 rows in.
Final output should be:
 rows | first_day  |  last_day
------+------------+------------
 6367 | 2000-08-23 | 2025-12-31
Verify wal_level:
psql "host=$RDSHOST port=5432 dbname=oil user=postgres sslmode=verify-full sslrootcert=./global-bundle.pem"SHOW wal_level;
-- must return: logical (not "replica")
SHOW max_replication_slots;
-- must be >= 1 (default is usually 10)If wal_level says replica, the parameter group isn't applied. Go back to step 1.4.
2.1 Confirm the user has replication privilege
On AWS RDS, the master user (postgres) is not a true PostgreSQL superuser — AWS never grants the raw REPLICATION attribute, so ALTER USER postgres WITH REPLICATION; will fail with "permission denied to alter role". Use the RDS-specific role instead:
GRANT rds_replication TO postgres;Verify it took effect:
SELECT r.rolname AS granted_role
FROM pg_auth_members m
JOIN pg_roles r ON r.oid = m.roleid
WHERE m.member = 'postgres'::regrole;
-- must return: rds_replication
Note:
SELECT usename, userepl FROM pg_user WHERE usename = 'postgres'will still showuserepl = fafter this grant. That is normal on RDS —usereplonly reflects the directREPLICATIONattribute, not role membership. DMS checks replication-slot creation capability (granted byrds_replication), not this column.
Part 3 — DMS S3-writer IAM role (Option B only — 1 min)
Skip this part if you chose Option A (PostgreSQL target). Go straight to Part 4.
DMS needs an IAM role with write access to your S3 bucket. You don't have to create this manually — when you configure the S3 target endpoint in Part 5.2 Option B, the DMS console offers a "Create new IAM role" link that creates the role + inline policy in one click. Use that.
If you'd rather pre-create the role (for repeatable scripted setups, or to avoid the wizard side-trip), here's the manual path. Otherwise skip to Part 4.
Manual creation (optional) — IAM console → Roles → Create role
| Field | Value |
|---|---|
| Trusted entity type | AWS service |
| Use case | DMS |
| Role name | dms-cdc-s3-role-<U> |
Skip the AWS-managed policies dropdown, click Next → Create role.
Open the role → Add permissions → Create inline policy → JSON tab:
{
  "Version": "2012-10-17",
  "Statement": [{
    "Effect": "Allow",
    "Action": ["s3:PutObject", "s3:DeleteObject", "s3:ListBucket", "s3:GetBucketLocation"],
    "Resource": [
      "arn:aws:s3:::quicklabs-student<U>-curated",
      "arn:aws:s3:::quicklabs-student<U>-curated/*"
    ]
  }]
}
Save as dms-s3-inline. Then in Part 5.2 use this role ARN directly instead of clicking "Create new IAM role."
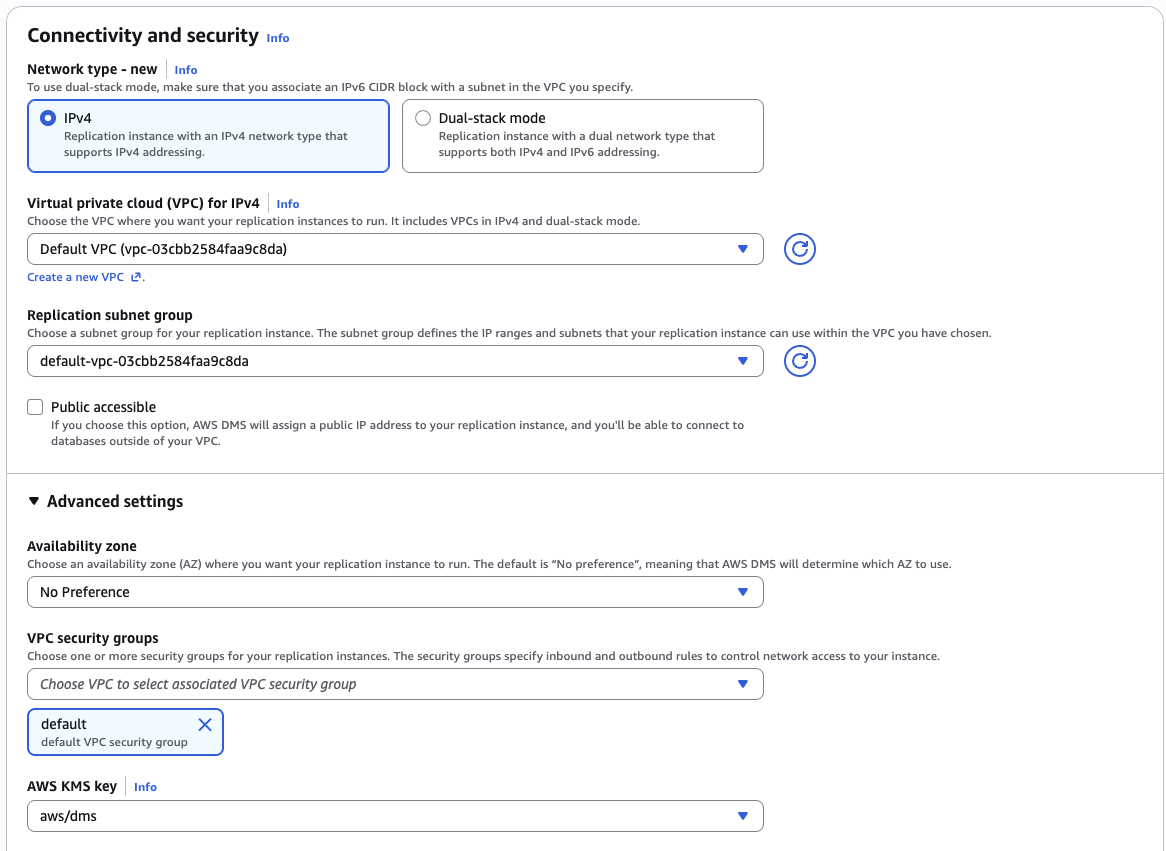
Part 4 — Create the DMS replication instance (10 min)
DMS console → Replication instances → Create replication instance
| Field | Value |
|---|---|
| Name | oil-cdc-rep-<U> |
| Instance class | dms.t3.micro (cheapest, free tier eligible) |
| Engine version | latest |
| Allocated storage | 20 GB |
| VPC | same VPC as your RDS |
| Multi-AZ | dev or non-prod (single AZ) |
| Publicly accessible | No |
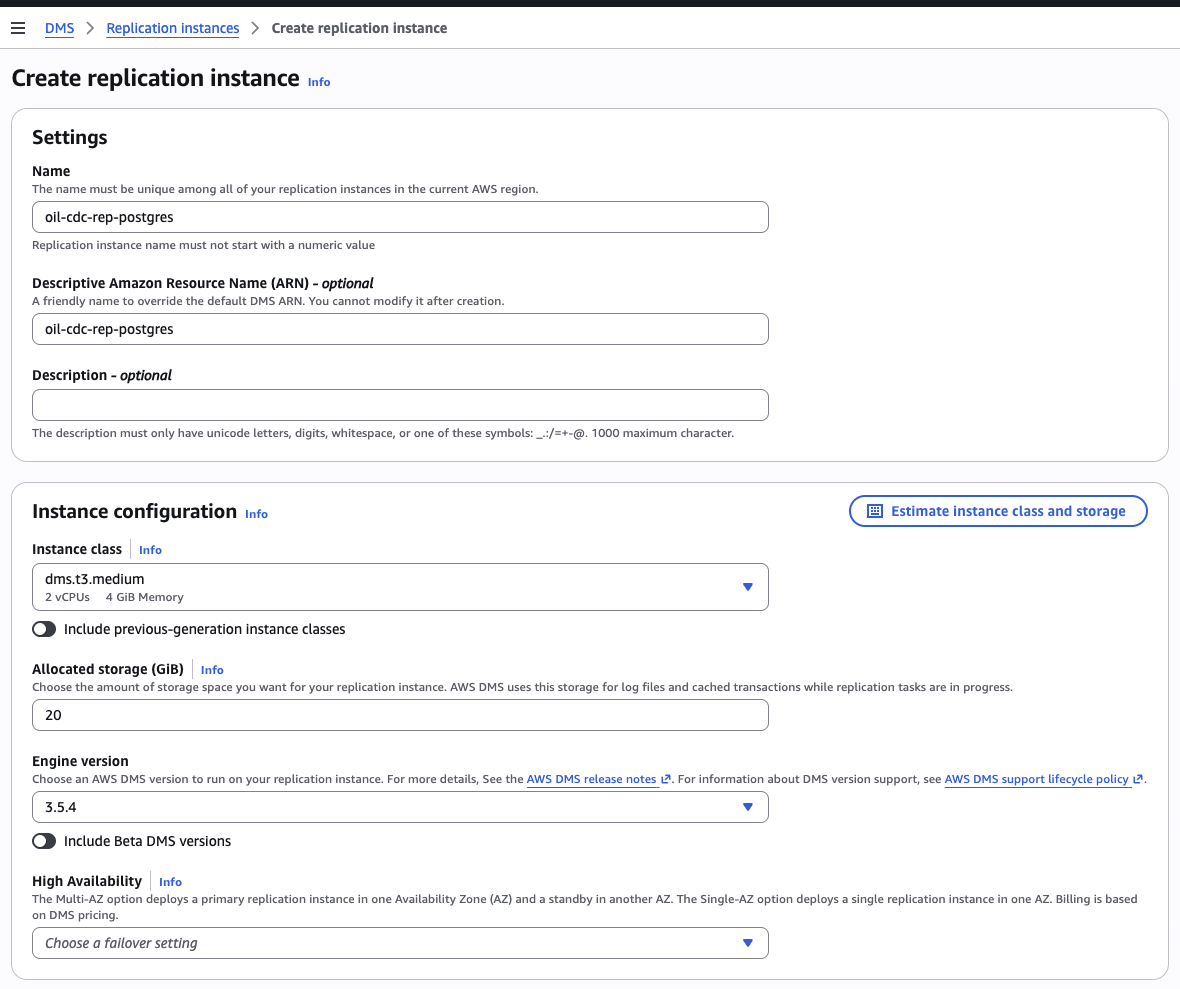
Provisioning takes ~5 minutes. Move on to the endpoints while it provisions.
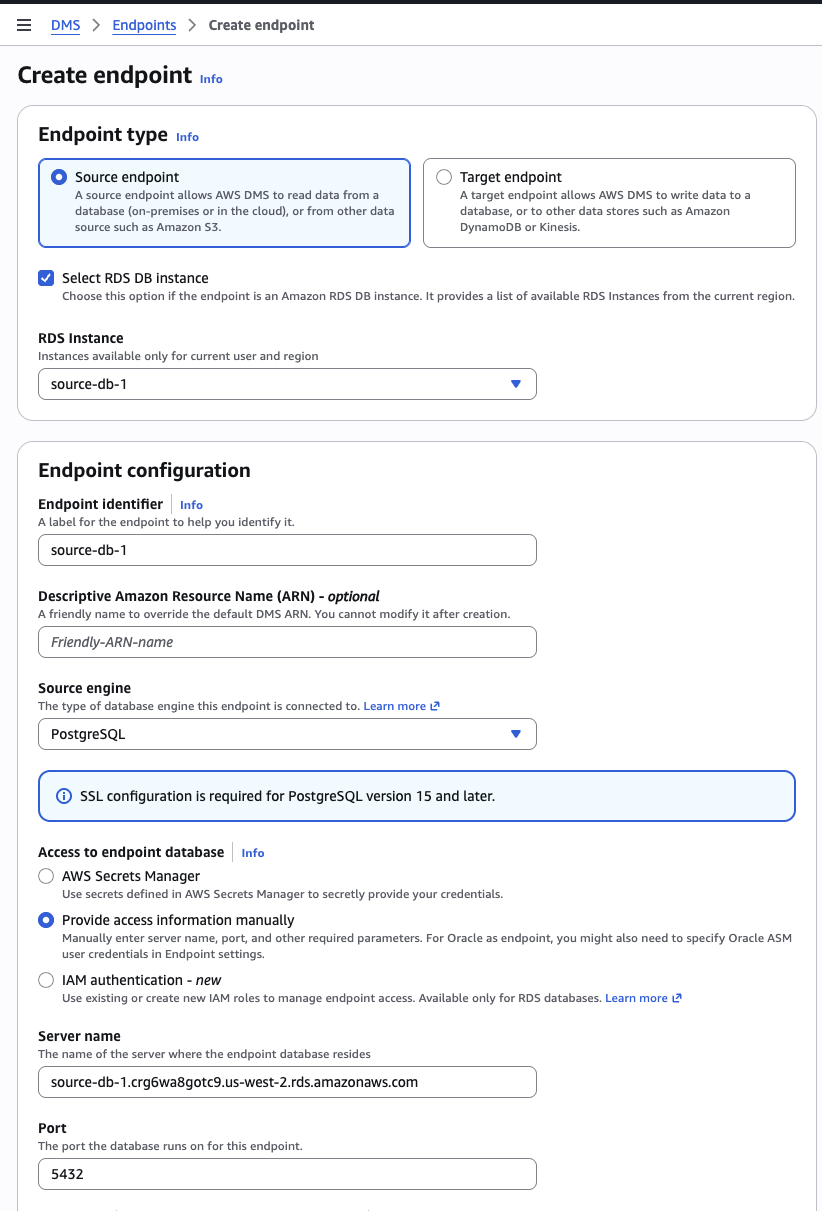
Part 5 — Create the source and target endpoints (5 min)
5.1 Source endpoint (Postgres)
DMS console → Endpoints → Create endpoint
| Field | Value |
|---|---|
| Endpoint type | Source |
| Endpoint identifier | oil-source-pg-<U> |
| Source engine | PostgreSQL |
| Server name | your RDS endpoint (e.g. oil-db-<U>.xxx.us-west-2.rds.amazonaws.com) |
| Port | 5432 |
| Database name | oil |
| User name | postgres |
| Password | your password |
| SSL mode | require — NOT none (RDS rejects unencrypted) |
Test connection (pick oil-cdc-rep-<U> as the rig). Must say "Successfully connected" before continuing.
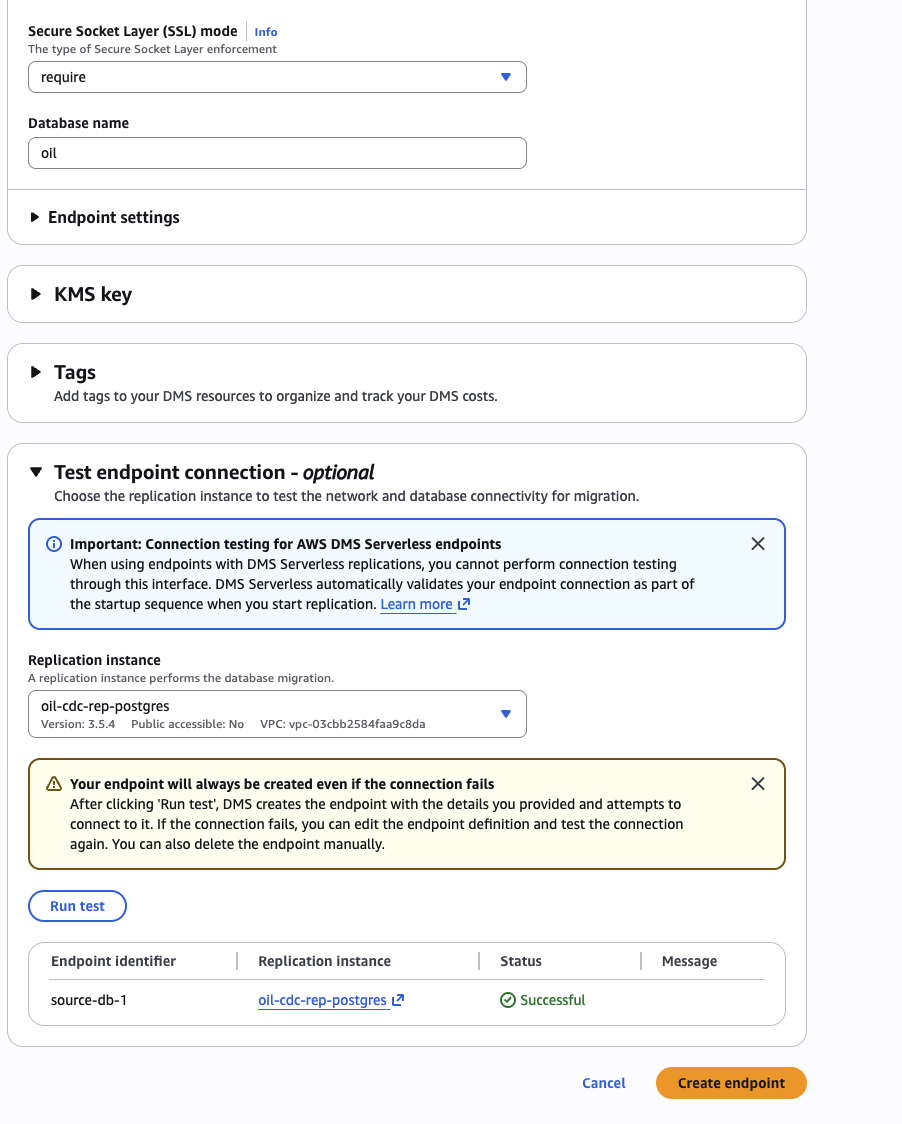
Common error here: no pg_hba.conf entry for host ... no encryption means SSL mode is still none. Modify the endpoint, change to require, retest.
5.2 Target endpoint — choose your option
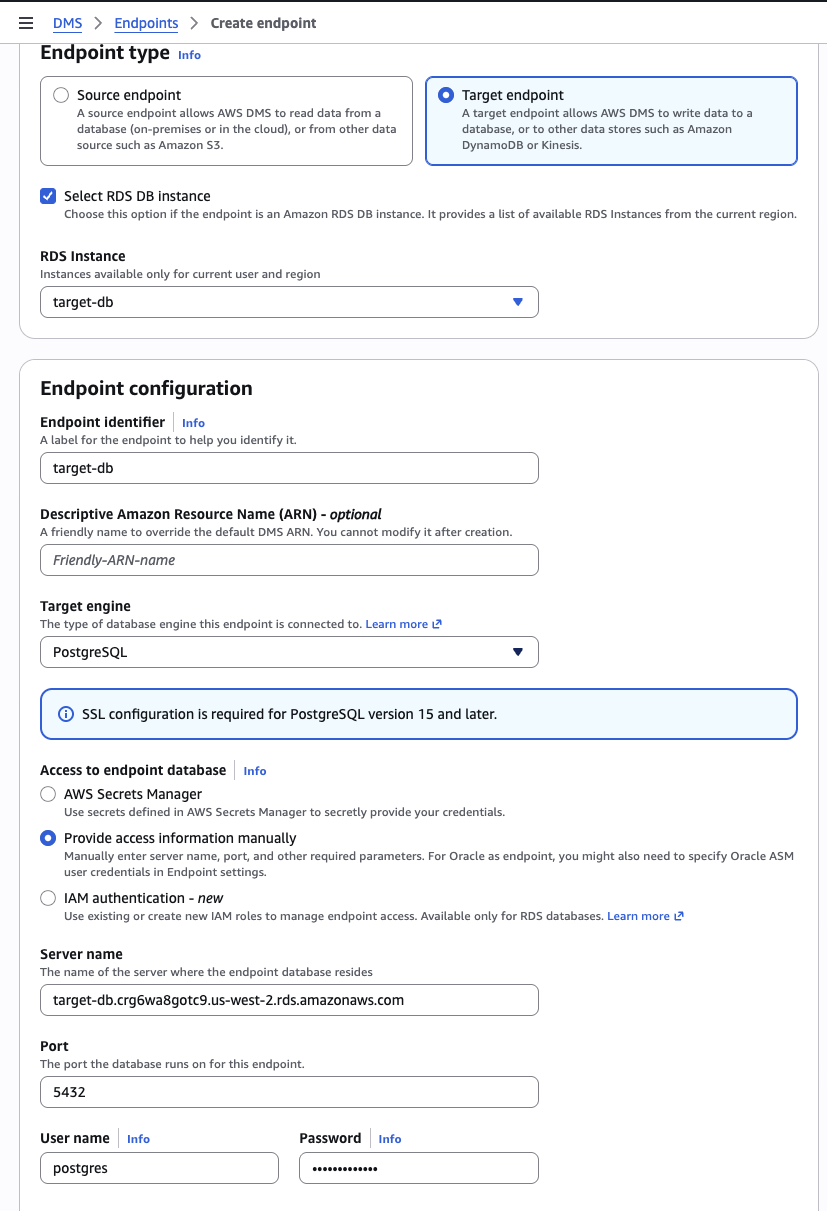
Option A — PostgreSQL RDS target (screenshots)
Create a second RDS Postgres instance to receive the replicated data, then point DMS at it.
Pre-step: Create the target database in psql before the DMS task runs:
CREATE DATABASE oil_target;DMS console → Endpoints → Create endpoint
| Field | Value |
|---|---|
| Endpoint type | Target |
| Endpoint identifier | oil-target-pg-<U> |
| Target engine | PostgreSQL |
| Server name | your target RDS endpoint |
| Port | 5432 |
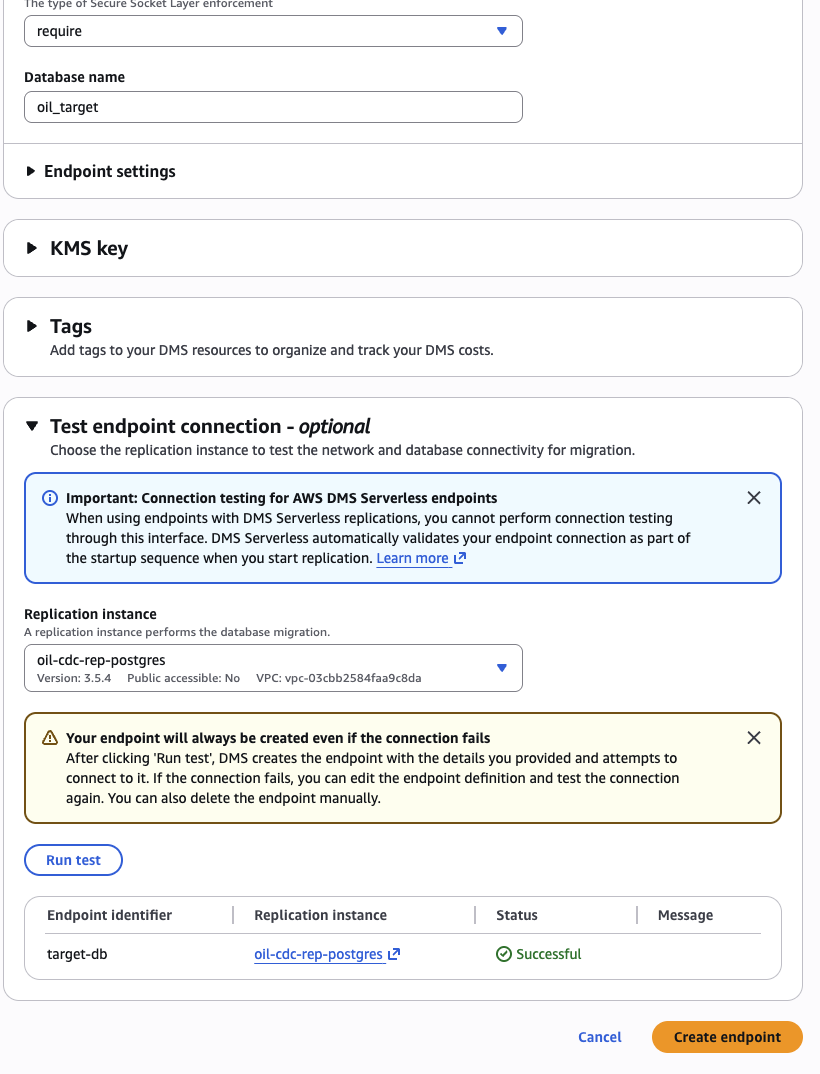
| Database name | oil_target |
| User name | postgres |
| Password | your password |
| SSL mode | require |
Test connection against oil-cdc-rep-<U>. Must say "Successfully connected".
Option B — S3 target
DMS console → Endpoints → Create endpoint
| Field | Value |
|---|---|
| Endpoint type | Target |
| Endpoint identifier | oil-target-s3-<U> |
| Target engine | Amazon S3 |
| IAM role ARN | Click "Create new IAM role" — the console creates one with the right permissions. (Or paste the ARN of dms-cdc-s3-role-<U> if you pre-created it in Part 3.) |
| Bucket name | quicklabs-student<U>-curated |
| Bucket folder | cdc (DMS will create {bucketFolder}/{schema}/{table}/ underneath automatically) |
Endpoint settings → Wizard mode:
| Setting | Value |
|---|---|
dataFormat | csv |
includeOpForFullLoad | true |
cdcInsertsAndUpdates | true |
timestampColumnName | cdc_ts |
Test connection. Must pass.
Part 6 — Create the CDC task (3 min)
DMS console → Database migration tasks → Create task
| Field | Option A (Postgres target) | Option B (S3 target) |
|---|---|---|
| Task identifier | oil-cdc-task-<U> | oil-cdc-task-<U> |
| Replication instance | oil-cdc-rep-<U> | oil-cdc-rep-<U> |
| Source endpoint | oil-source-pg-<U> | oil-source-pg-<U> |
| Target endpoint | oil-target-pg-<U> | oil-target-s3-<U> |
| Migration type | Migrate and replicate (full load + CDC) | Replicate data changes only (CDC only) |
| Start task on create | Yes | Yes |
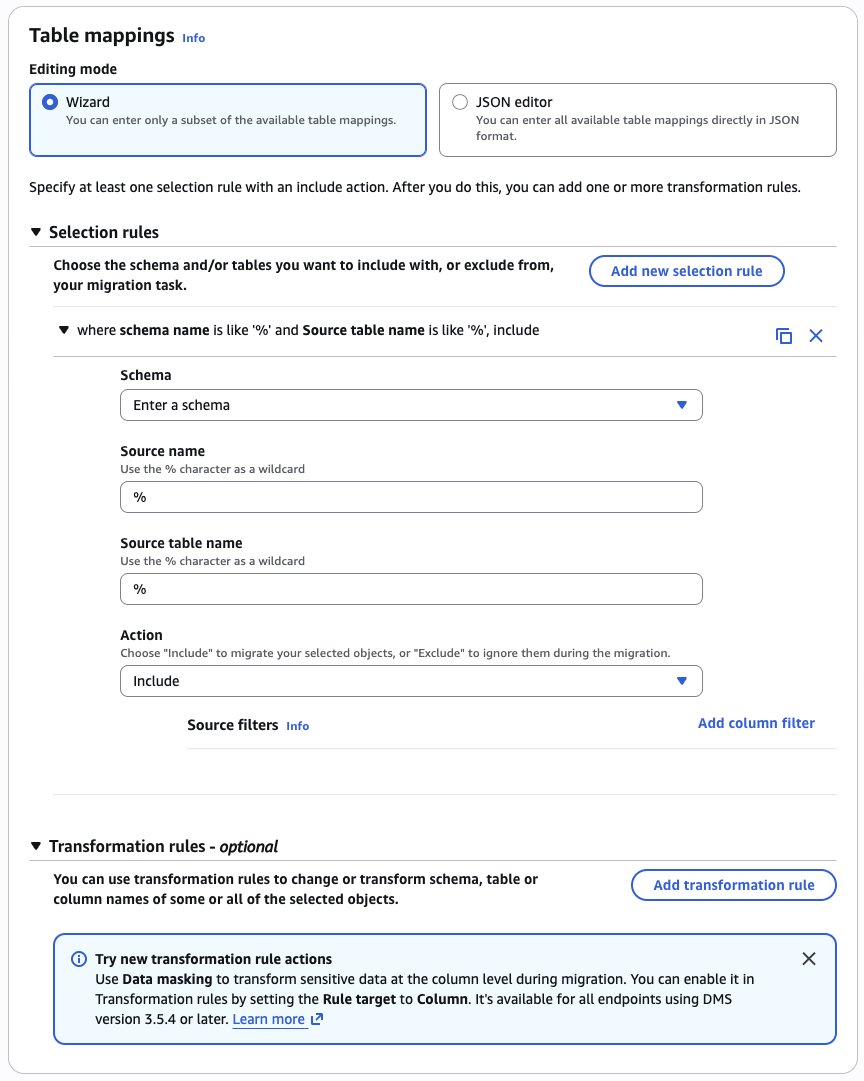
| Table mappings (Wizard) | Schema public, table crude_oil_daily, Include | Schema public, table crude_oil_daily, Include |
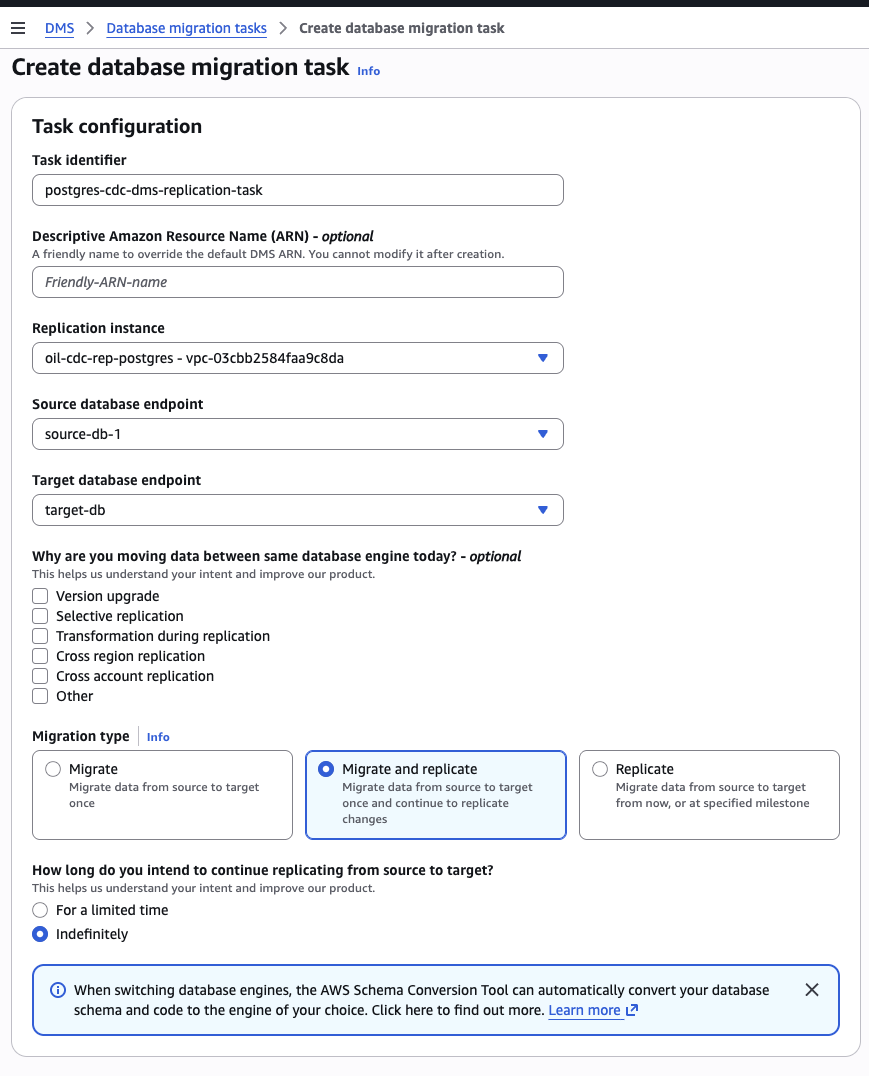
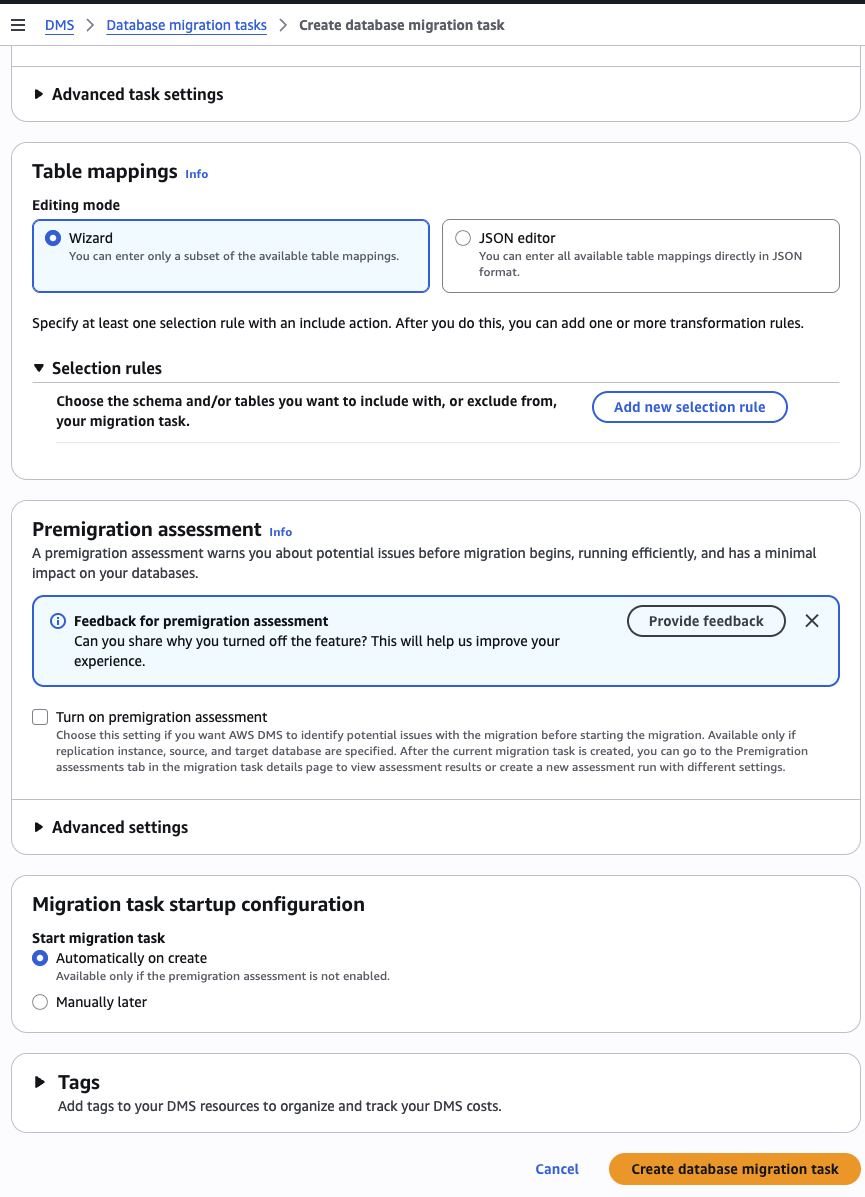
Click Create task. Wait ~30-60 seconds. Status should move from Creating → Starting → Replication ongoing.
If status goes to Failed, check Last error message on the task detail page. Common error: Unable to use plugins to establish logical replication. Fix path:
- Re-check that
SHOW wal_level;returnslogical(see Part 1.4 and Part 2) - Drop any stale replication slots:
SELECT slot_name, plugin, active FROM pg_replication_slots;thenSELECT pg_drop_replication_slot('slot_name'); - Restart the task (Actions → Restart/Resume)
Part 7 — Verify the migration and watch CDC in action (5 min)
Run the INSERT/UPDATE/DELETE statements from your psql window connected to the source database (oil). Observe results in your chosen target.
-- 7.1 Insert a new trading day
INSERT INTO public.crude_oil_daily (trade_ts, open, high, low, close, volume, ticker, name)
VALUES ('2026-06-01 00:00:00-04', 75.00, 76.50, 74.80, 75.90, 250000, 'CL=F', 'Crude Oil Futures (CL=F)');

-- 7.2 Update the row
UPDATE public.crude_oil_daily SET close = 999.99
WHERE trade_ts = '2026-06-01 00:00:00-04';

-- 7.3 Delete the row
DELETE FROM public.crude_oil_daily WHERE trade_ts = '2026-06-01 00:00:00-04';

-- 7.4 Batch INSERT (3 rows in one statement)
INSERT INTO public.crude_oil_daily (trade_ts, open, high, low, close, volume, ticker, name) VALUES
    ('2026-06-03 00:00:00-04', 80.00, 81.00, 79.80, 80.50, 200000, 'CL=F', 'Crude Oil Futures (CL=F)'),
    ('2026-06-04 00:00:00-04', 81.10, 82.50, 80.90, 82.20, 215000, 'CL=F', 'Crude Oil Futures (CL=F)'),
    ('2026-06-05 00:00:00-04', 82.40, 83.00, 81.70, 82.85, 198000, 'CL=F', 'Crude Oil Futures (CL=F)');
Option A — Verify in the PostgreSQL target
Connect to the target database and confirm the full load landed and changes are replicated:
-- Connect to the target RDS instance
\c oil_target

-- Should show crude_oil_daily and awsdms_apply_exceptions
\dt

-- Full load: all 6,367 source rows should be present
SELECT COUNT(*) FROM crude_oil_daily;

-- CDC rows: your inserted rows should appear here too
SELECT trade_ts, close FROM crude_oil_daily
WHERE trade_ts >= '2026-06-01'
ORDER BY trade_ts;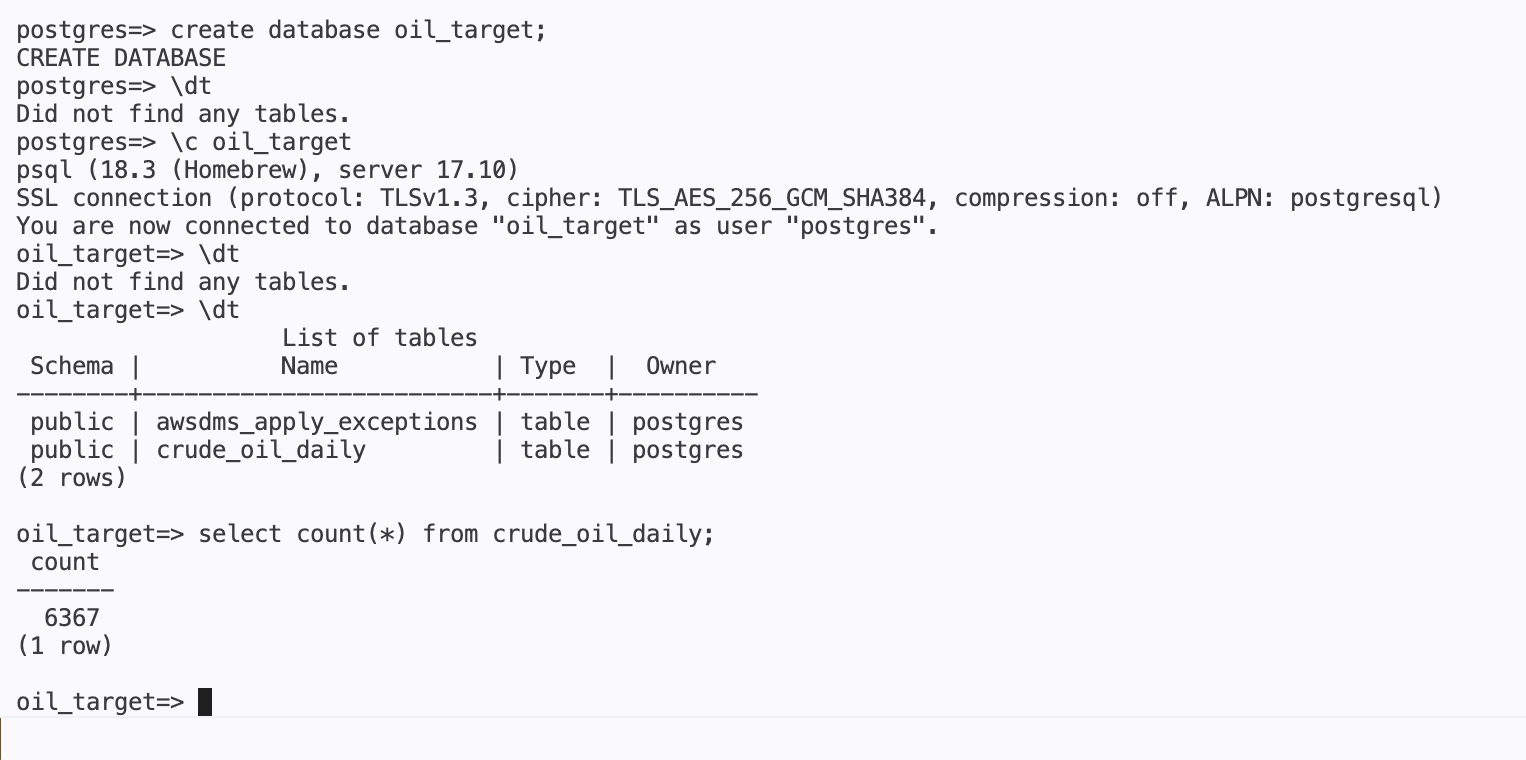
What you see:
awsdms_apply_exceptionsis a DMS bookkeeping table automatically created on the target.crude_oil_dailyshould have 6,367 rows from the initial full load, plus any CDC rows you inserted.
Option B — Verify in S3
Open two browser windows:
- S3 console →
quicklabs-student<U>-curated→cdc/folder (empty at start) - psql window → run the statements above
After each statement, wait ~10-30 seconds and refresh S3. Files appear under cdc/oil/public/crude_oil_daily/:
| Operation | File prefix | What's inside |
|---|---|---|
| INSERT | I | The new row + cdc_ts timestamp |
| UPDATE | U | Before-image and after-image of the row |
| DELETE | D | The deleted row |
| Batch INSERT (3 rows) | I | One file for all three rows — DMS batches related changes |
7.5 Check task statistics (both options)
DMS console → Tasks → oil-cdc-task-<U> → Table statistics:
You should see for public.crude_oil_daily: Inserts ≥ 4, Updates = 1, Deletes = 1.
Cleanup (REQUIRED before end of session)
Stop and delete everything you created — DMS resources cost real money per hour even when idle.
You've now completed the AWS Data Engineer Roadmap — six chapters covering AWS fundamentals, S3/Glue/Athena data lake, event-driven ingestion with Lambda, Lake Formation governance, Redshift Serverless analytics, and change data capture with DMS. The same patterns you walked through here show up in nearly every production AWS data platform.
Want to bring this to your team? Book a free 30-minute call for consultation or a custom workshop/training.
Book a Free ConsultationI publish new labs every week.
Get them in your inbox — free, no spam.
This lab is part of the AI Cloud Engineer Bootcamp. Weekly live sessions with mentoring and community access.
View the full program